
Sol’s E46 Rally Build… Introduction

Growing up Sol was an all time fan of RWD cars, and rallying was always a distant dream of his. Fast forward to being in a position to turn it into a reality, Sol jumped on the opportunity and gave it some serious thought. Given his experience with project cars over the years, he knows how complicated and time consuming they can become. Having a reliably built car needed to be at the core of his decision; and after doing a fair portion of research for a competitive RWD car, Sol landed on the idea of a BMW.
Specifically the E46 M3, which is not only reliable but is also a very strong competitive based car and is the most logical choice to start with. In addition to this, he would be taking a leap into a form of racing that he had little to no experience. Not being versed in this form of motorsport from a competitive standpoint, Sol spent a significant amount of time doing some research on the vehicle itself as he never owned a performance based BMW before. The E46 comes from the factory with a very capable motor, suspension and braking system; this is combined with a great chassis, making it optimal for most forms of motorsport.
Upon making a decision on moving forward with this plan, Sol went on a hunt for an unmolested E46 that wouldn’t require much effort in transforming it to rally specifications. As the BMW is a European based car, he decided it would be best to search within the U.K for a car that matches his criteria. He was successful in his search and found a great base to start with and immediately went to work on having the car stripped to be prepared. We’ll be taking a look at the first photos of the car when Sol purchased it and following through upon arrival on the island.
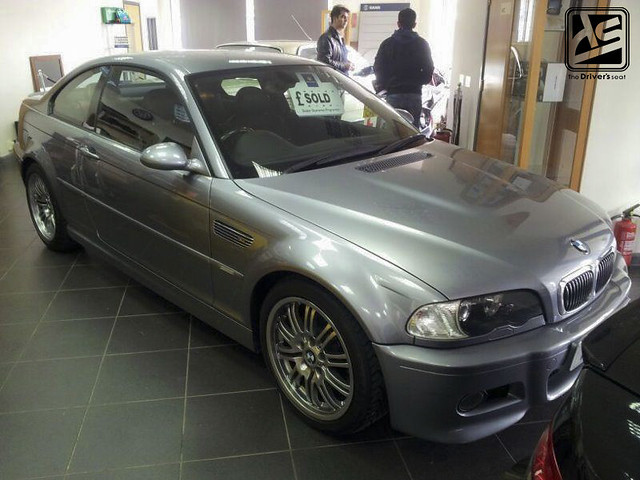
A first look at the E46 M3 Sol purchased, which was in mint condition…
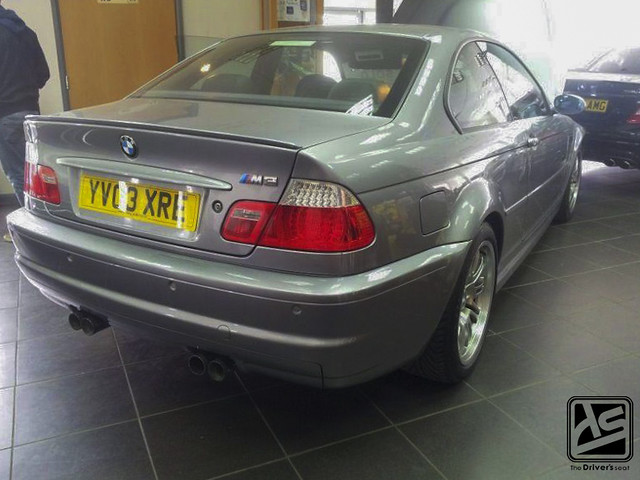
A look at the rear of the car while it was in the showroom on display…
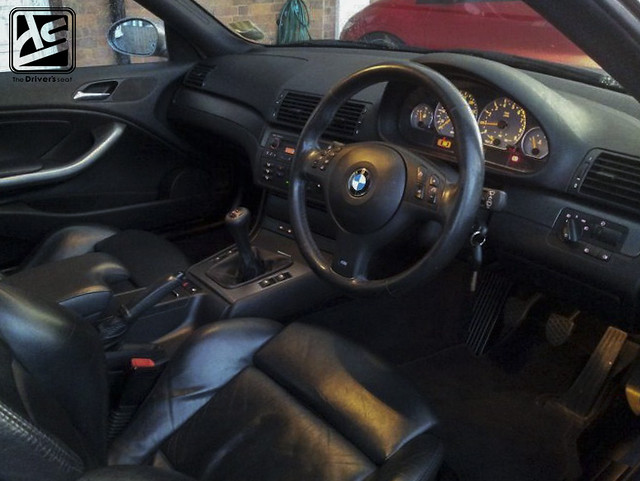
A look at the interior with the optional leather seats…

Given the age, the car was relatively low mileage…

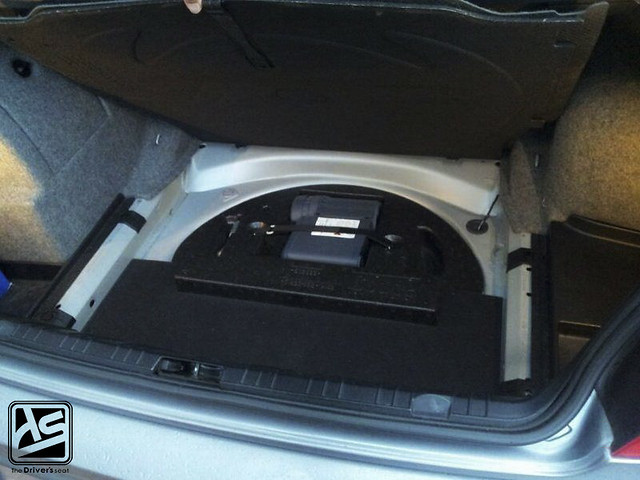
Moving to the rear you guys can get a look at just how well maintained the car was…
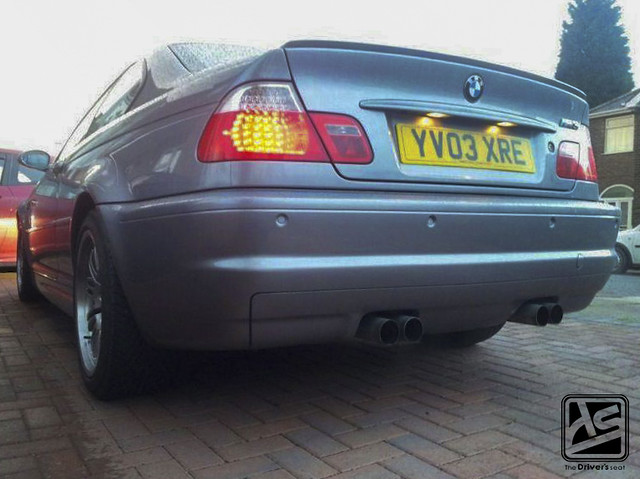
Another shot of the rear just before it was on the way to be stripped…
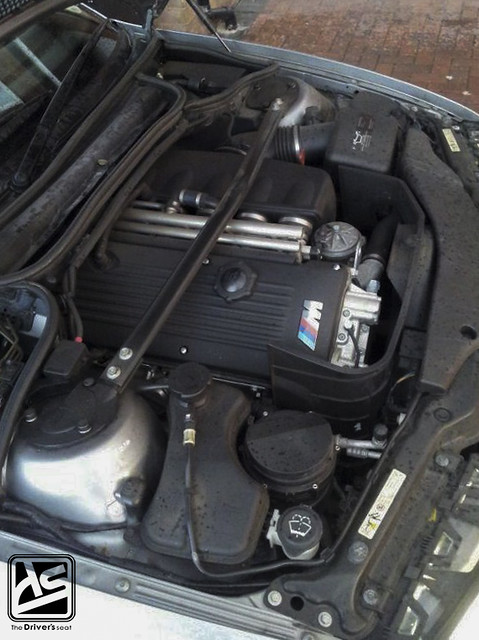
A few engine bay shots of the bone standard S54 motor…
The car was then stripped and sent to Custom Cages. While it was there the guys fitted it with one of their units to ensure the car will be legal for competition. This would also speed up the process of having the cage fabricated locally after it arrived. Upon completion the car was then loaded up and shipped…

Shortly after the car was cleared and arrived at the workshop…


The doors and other misc pieces stuffed inside of the car…
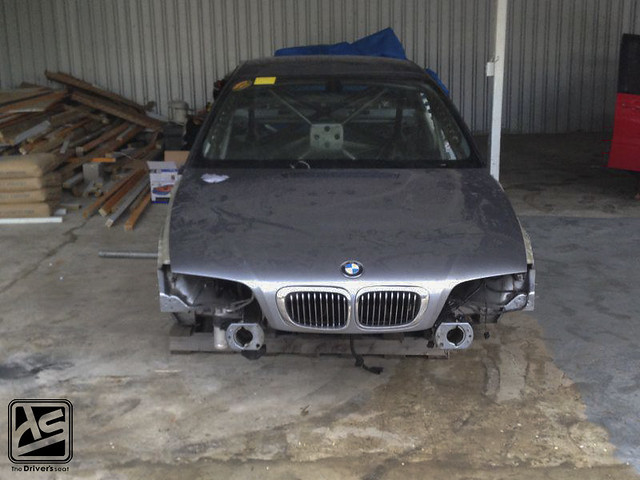
A look at the partially torn apart front end as the car sat on a pallet…

A look at the bay with the hood removed; from here the remaining items will be stripped before sending it off to be painted…

A first look at the cage after the guys showed it some love with some sand paper…
The car sat for some time after arriving on the island awaiting some parts before it was sent off to Corbin’s Garage to begin the bodywork and paint phase…
Based on the condition, it was clear the car had been sitting in storage for quite a while. Nevertheless it was time to start making some moves on the build…


The E46 shell shortly after it arrived at the garage for the guys to fully assess the condition and make a decision on how they should proceed…

Since the car’s arrival on the island, the front end had not been reassembled; a side shot of the missing front fender…


Varying angles of the torn apart front end exposing the steering rack and bottom arms…
A shot of the engine bay where the cage ties into the shock towers…
Moving our way to the inside of the car, the exposed Custom Cages unit had seen better times…
A look at the dash bar that ties into the cage…

A view of the gusseted driver’s side door bars…

Bars on bars on bars…


In the rear a significant amount of pipe was added to aid with the rigidity of the chassis…

A view of the trunk area…
A glimpse of the fitment on the factory wheels…

From the factory the E46 M3 comes with BBS 18×8 wheels at the front and 18×9 in the rear…
The wheels came wrapped in a set of 225/45 series tyres…

Another look at the gusseted door bar, this time from the passenger’s side…
Cant get enough of this centre gusseted cross bar setup…
A look at where the mid points of the centre section ties into the chassis…

The guys went all out on the gusseted sections on this cage, here they are in the cross bars for the roof…


A look at the floor where the factory seating brackets were removed in favor of some custom seating brackets that would allow both driver and navigator to be positioned lower in the car…
Full side shot of the M3 sitting…
After going through the car from top to bottom the guys came up with a game plan and started to begin work…

A view through the quarter panel where you catch a glimpse of the Custom Cages tag…

The guys began by first stripping the remaining sealant from within the cabin….

The guys were making steady progress throughout the interior…

Next up was the removal of the rear windshield as to make things significantly easier while preparing the interior…


The trunk area after the bulk of the sealant was removed…
Along with the rear windshield, the front was also removed…


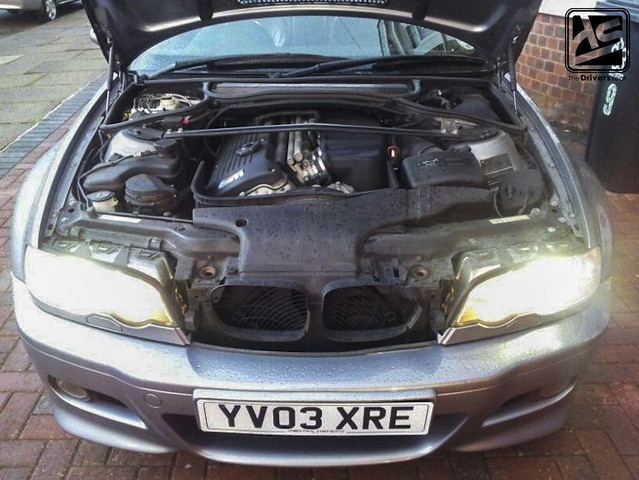
Working our way to the engine bay, it was clear where the guys spent most of their time…
A view of the current state of the engine bay after the guys went to work…

Random shot of the rear of the gutted E46 where the bars seem the be in perfect symmetry to each other…

Having completed the interior, trunk and engine bay, the guys focused on removing any and everything they could have from the fender arches…
A look under the rear fenders…


What I was able to capture on the front under arches removal…


And with that shot, thats all for today’s post. Thanks for taking a look at Sol’s E46 Rally build; and stay tuned for part one to come shortly where we take a look at the transition process carrying us into the paint stage.
Sol’s Evo IX Street Build… Part 1
This update has been in the making for some time, largely due to me wanting to capture a bit more content where this project was concerned. The main purpose of this is so you guys can see the car through a bit more stages. However, given Sol’s many projects the post was left dormant in my drafts folder for quite some time. As of recent I’ve decided to make the effort to complete for you guys.
No stranger to the Evo world, Sol has been through several combinations over the years and because of this, It aided in the parts selection with this current build. In this update we’ll be discussing the motor and gearbox assembly and taking a closer look at the parts used to execute the ultimate streetable Evo build. In addition to this, I have also included some photos and a short video of the car fully assembled for you guys. I hope you enjoy this post.
For those who may want to view the previous post on this build, I’ve provided the link below:
Sol’s Evo IX Street Build… Introduction

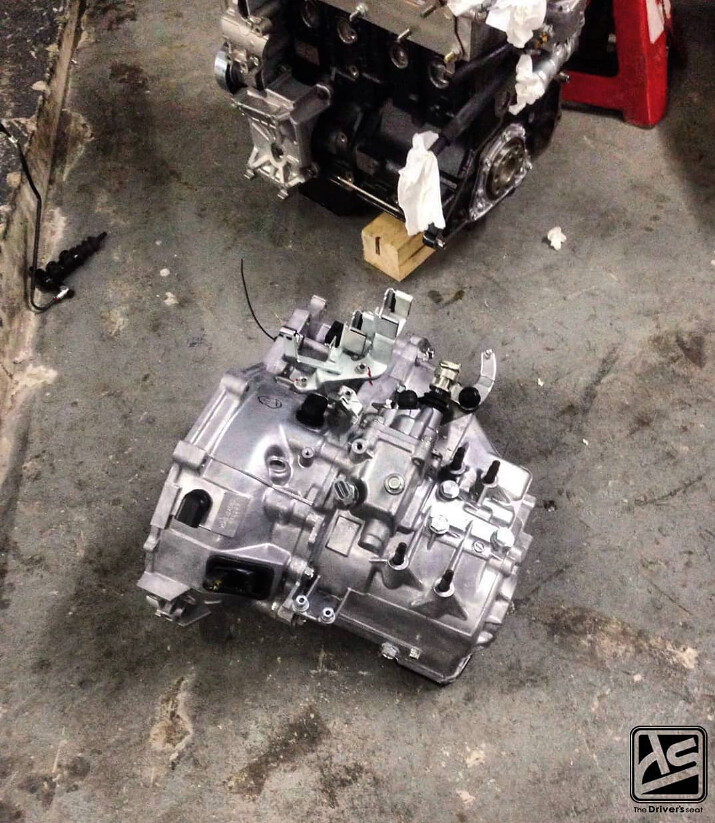
Having his fair share of failures with the OEM Evolution drivetrain, Sol made sure to check all the boxes where this was concerned. And went ahead and purchased a Shep Trans complete gearbox with a brand new casing and shifter mechanism. The box included a custom synchro mesh gear set accompanied by Wavetrac LSD.

To ensure there weren’t issues associated with shifting when the time came, Sol went with a triple plate Quartermaster clutch kit…

Which was inclusive of a hydraulic release bearing and adapter to replace the stock unit. This will convert the troublesome pull-style actuator to a more reliable and smoother feeling push-type release bearing…

With reliability in mind Sol wanted to have zero doubts when it came to the driveline. Not stopping there a stage 3 Shep Trans transfer case with an upgraded ring and pinion was acquired along with a Cusco rear LSD to close things for the drivetrain.

A shot of the Quartermaster clutch assembly installed on the motor…

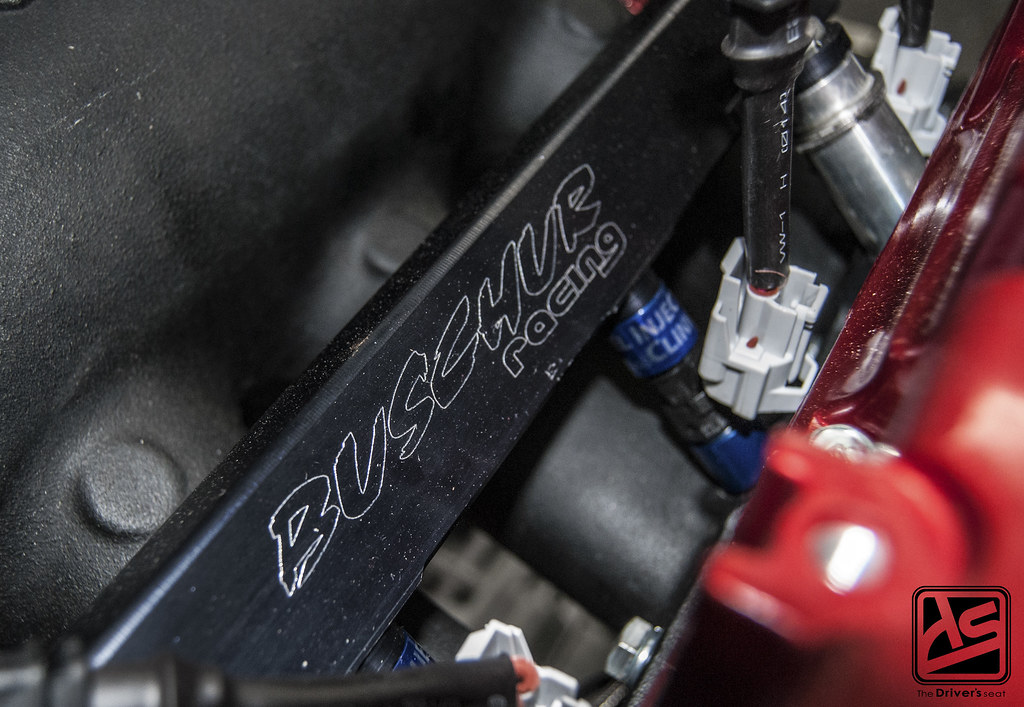
In an effort to build the ultimate street Evo, Sol wanted to have adequate torque on tap while cruising and enough power to be competitive at the track. With the goal in mind, a decision was made to purchase a Buschur motor capable of giving Sol the best of both worlds where power and torque were considered…

2.3L Buschur rpm motor:
Cosworth camshafts
High compression pistons
Hand ported stage 3 head
Replaced all other engine components ( belts, bearings, studs, gaskets etc.)

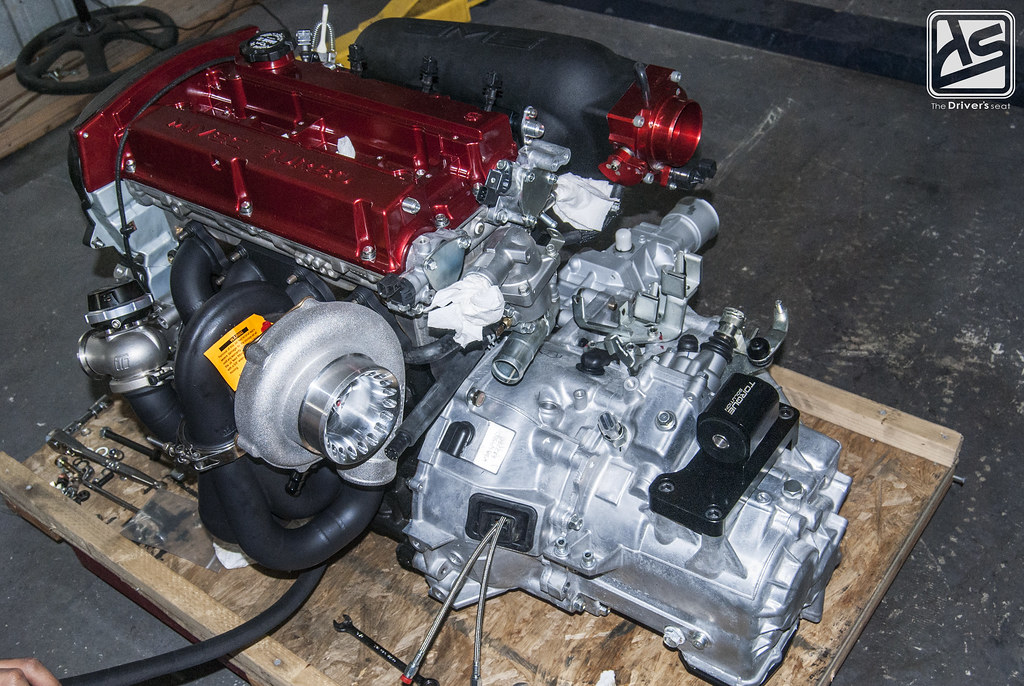
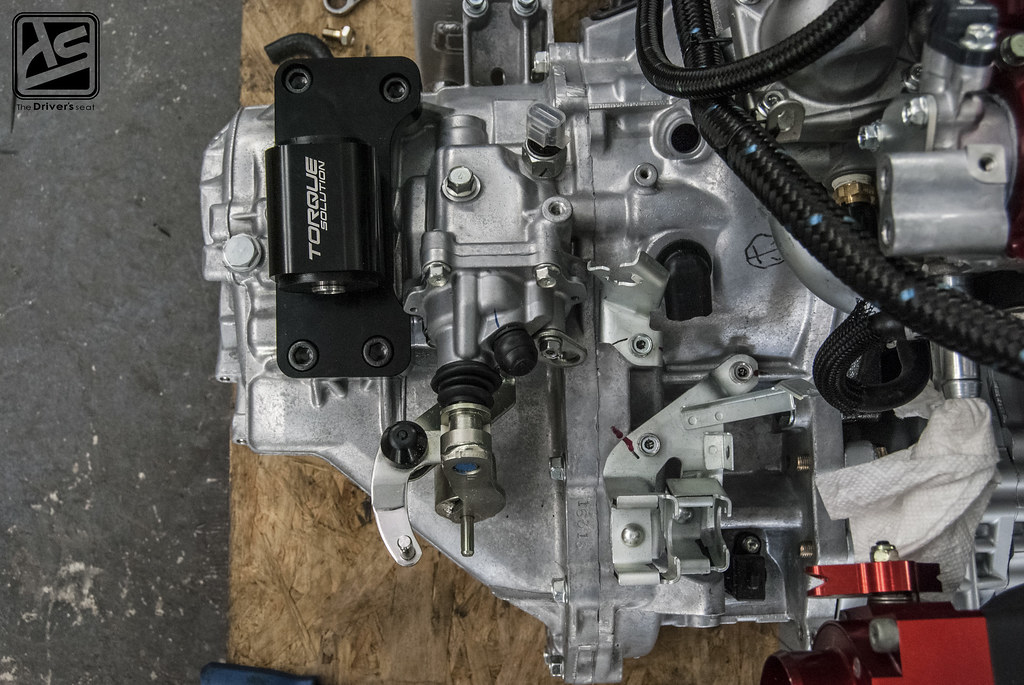
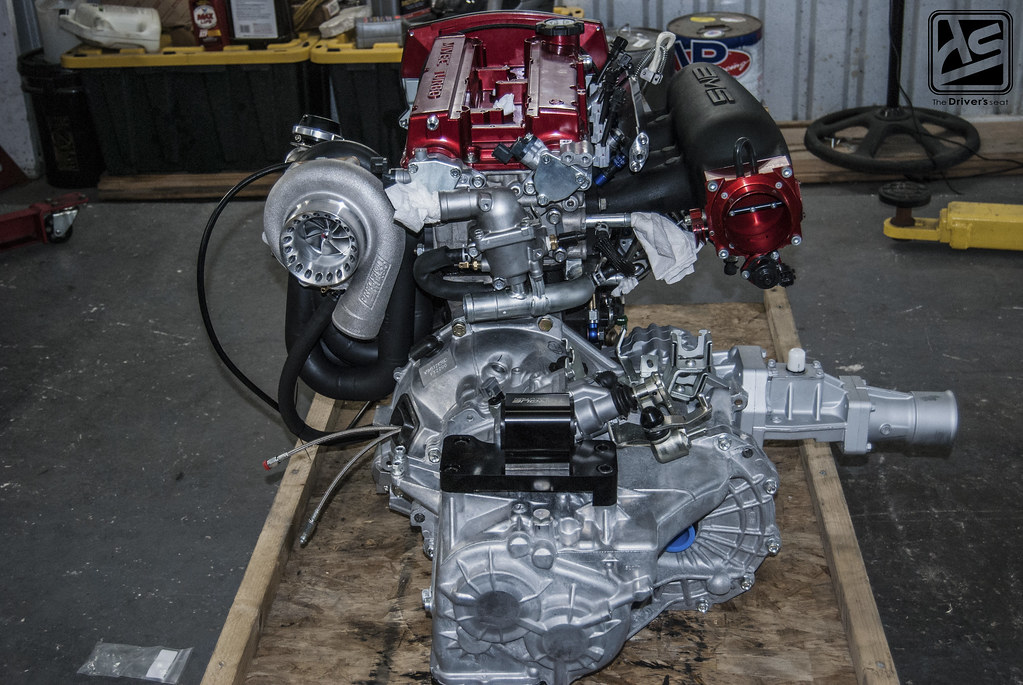
Shep Trans gearbox bolted to the motor, here you guys can see the Torque Solutions billet aluminum gearbox mount…
A thing of beauty…
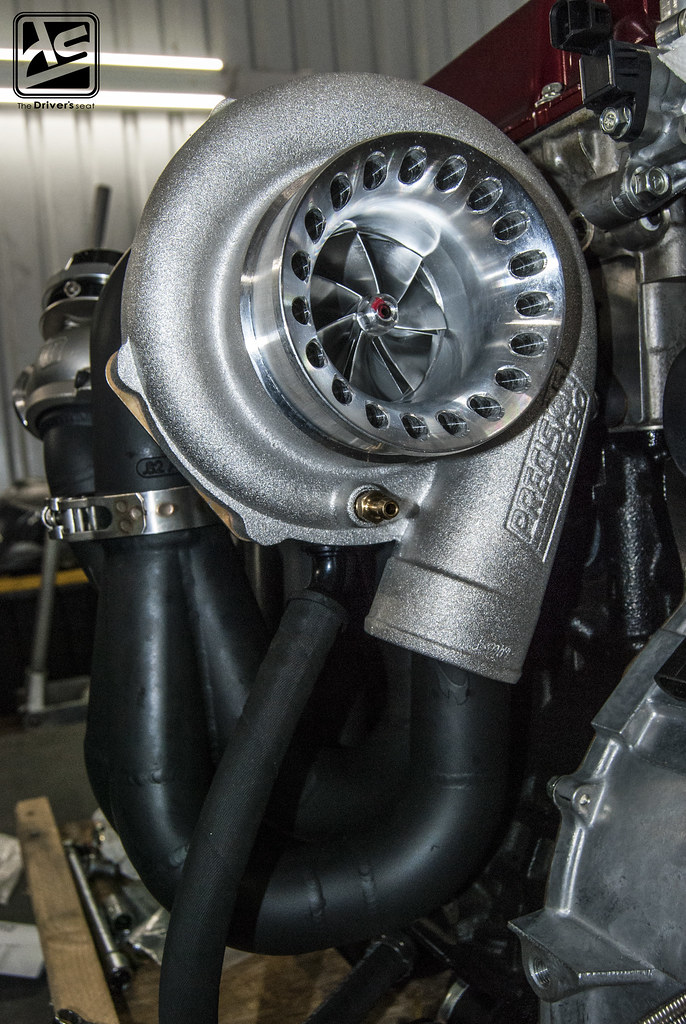
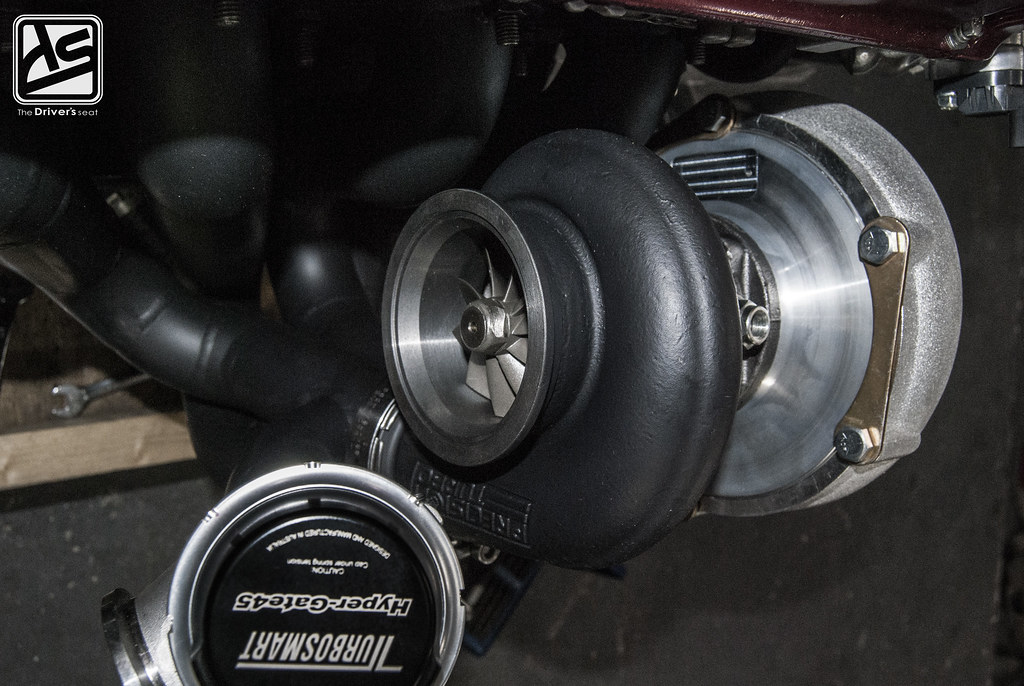
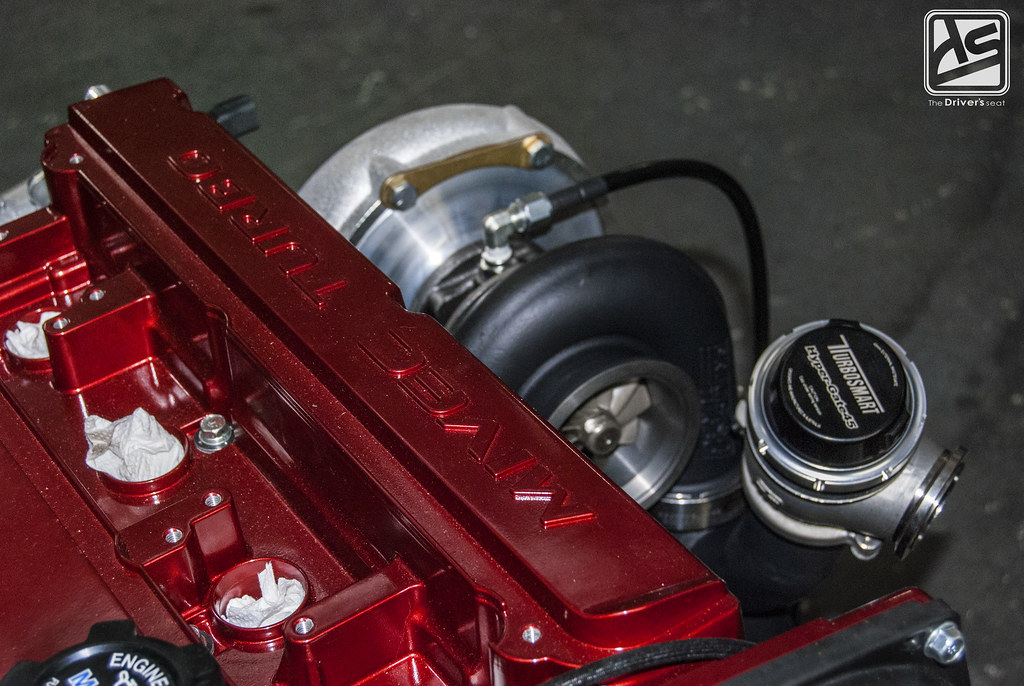
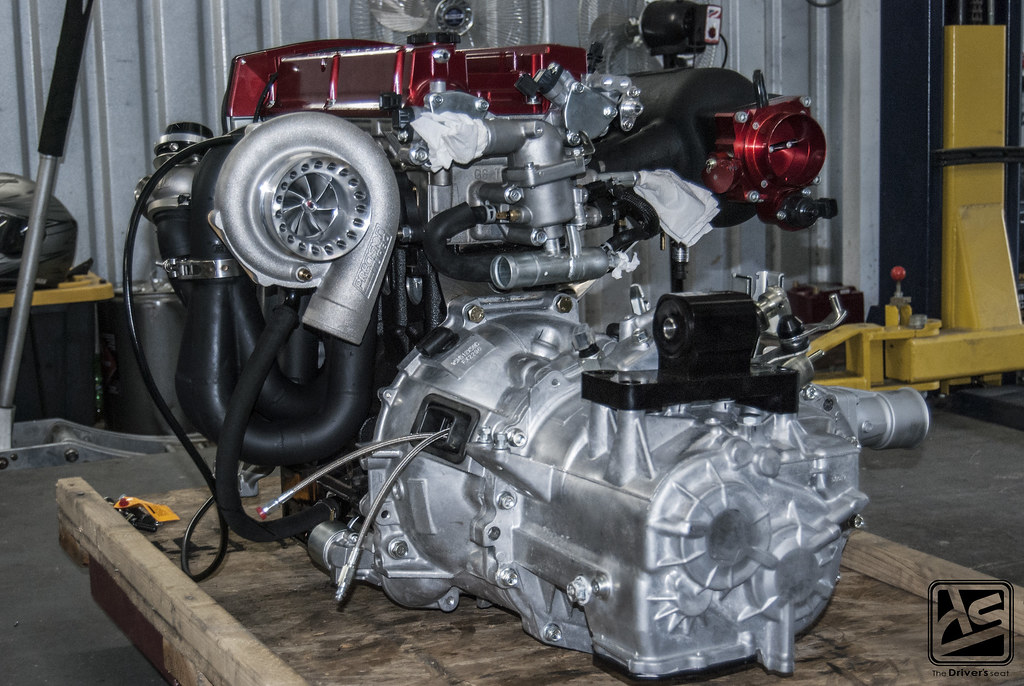
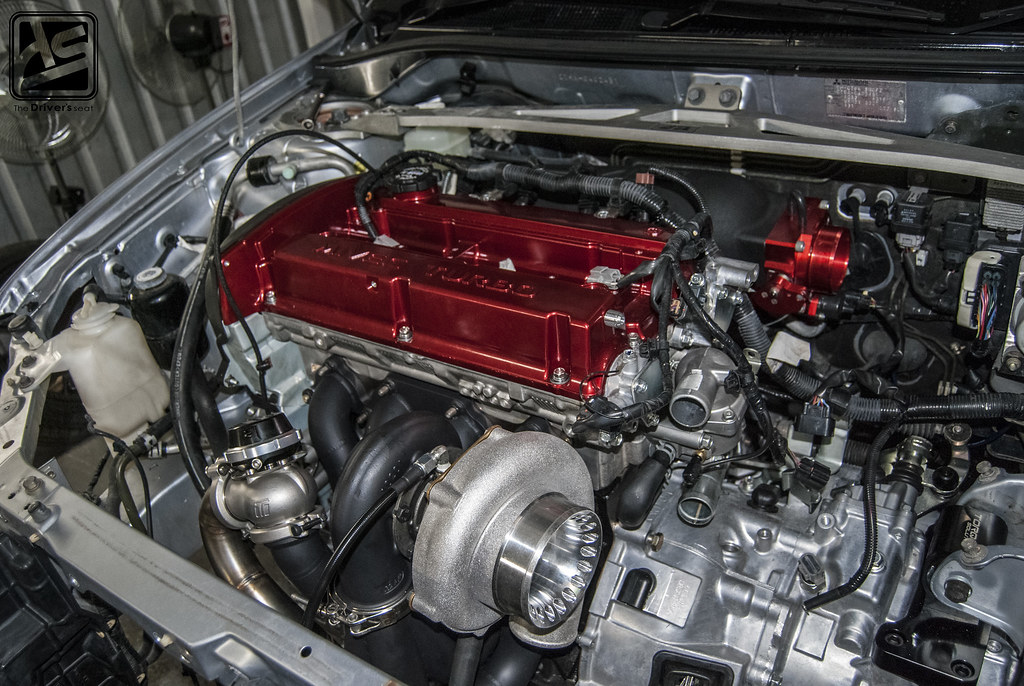
Sol opted to go with a Precision 6466 for this build…
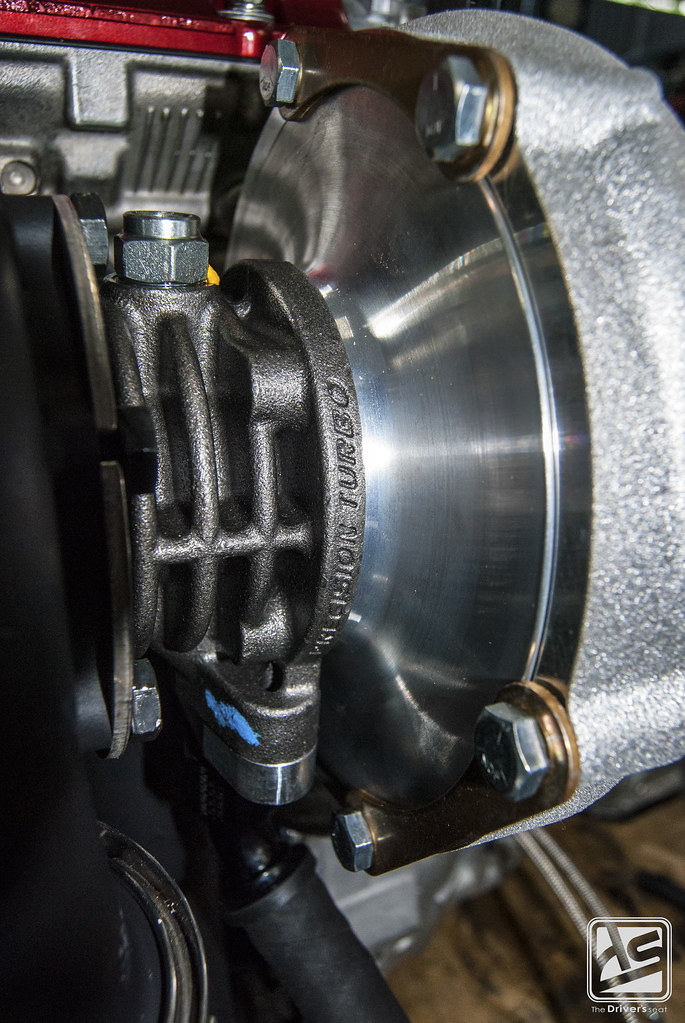
The Precision 6466 has a v-band connection and carries a .82 back end which also has been thermal coated…
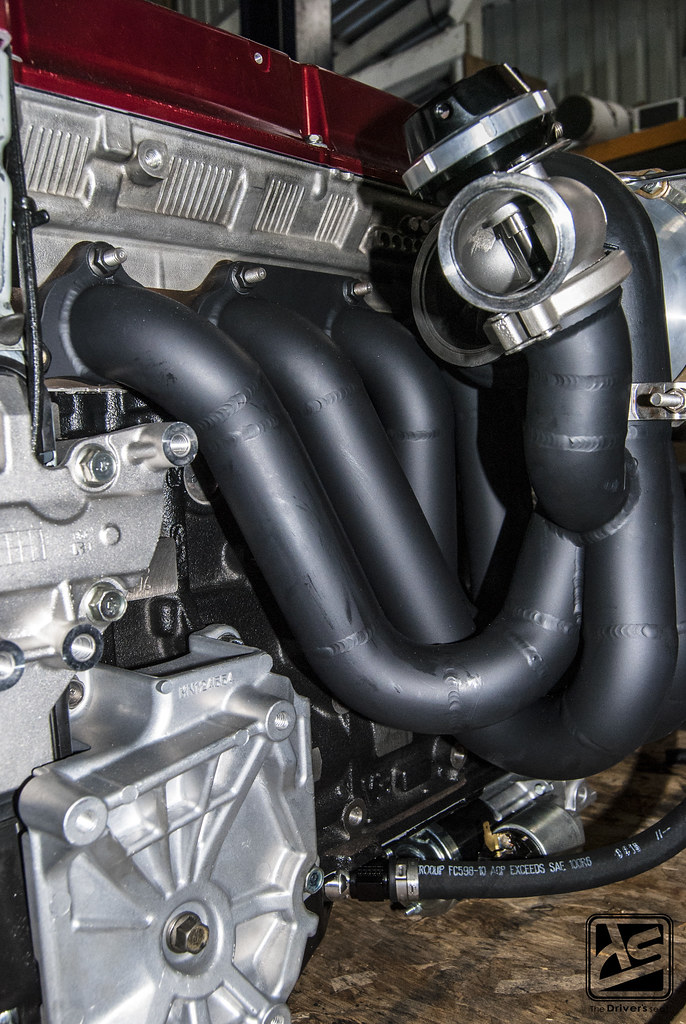
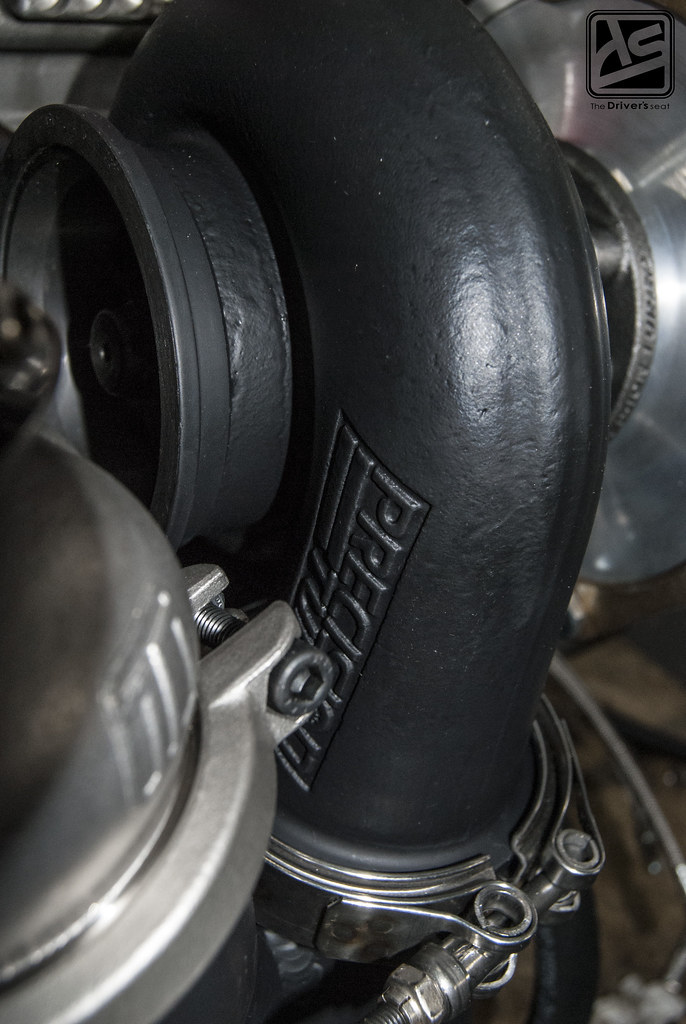
A closer look at the thermal coated Map Performance top mounted turbo manifold with external 44mm Turbosmart waste gate…

With everything bolted together Scott mapped out a plan on what to do next…
Scott went to work on mocking up the oil catch can lines and fittings…
Things starting to look good…
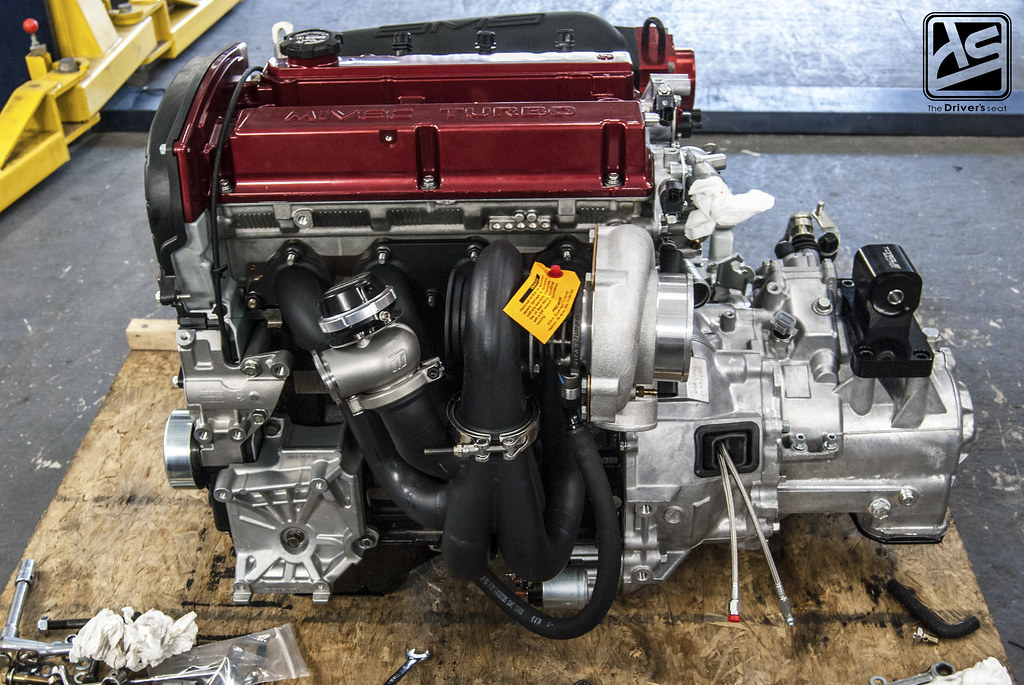
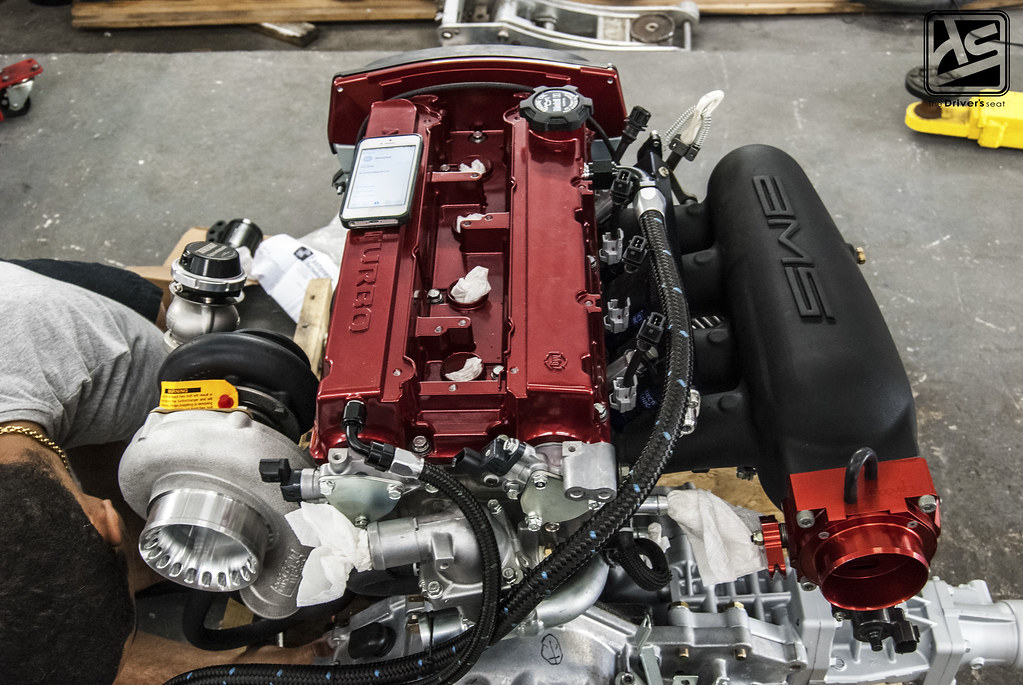
A better look at the AMS intake manifold with Boomba Racing 90mm billet throttle body…
Over on fuel duty, Sol went with a Buschur Racing fuel rail and set 2150cc Fuel Injector Clinic injectors, which are E85 compatible. To ensure the fuel is delivered to the motor a Buschur Racing double pumper fuel system complete with -10 fuel feed with -8 fuel return was installed…
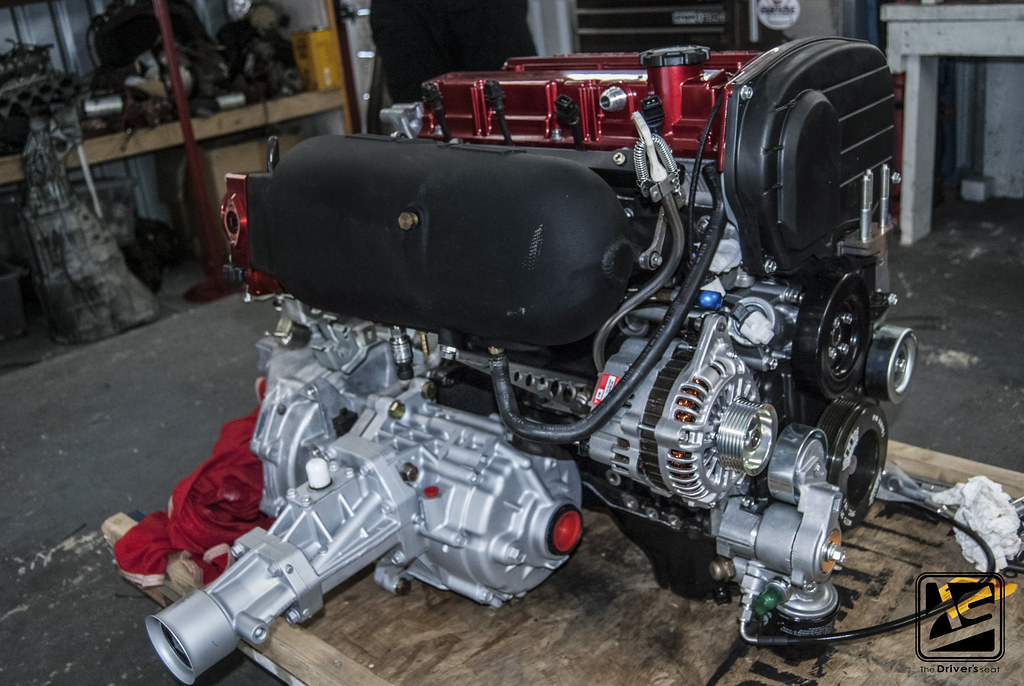

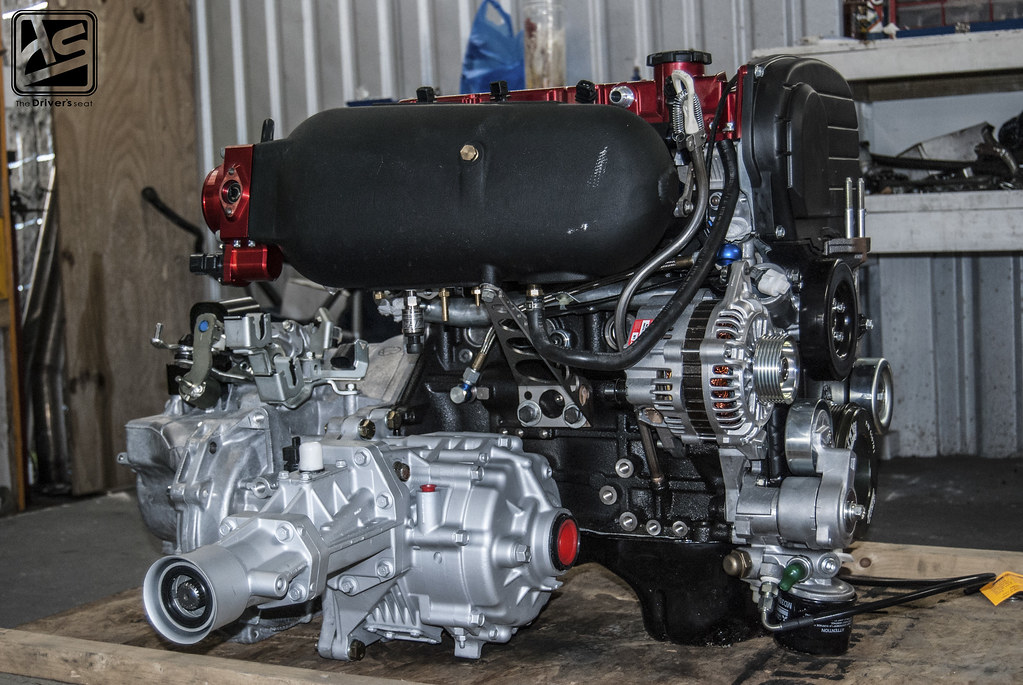
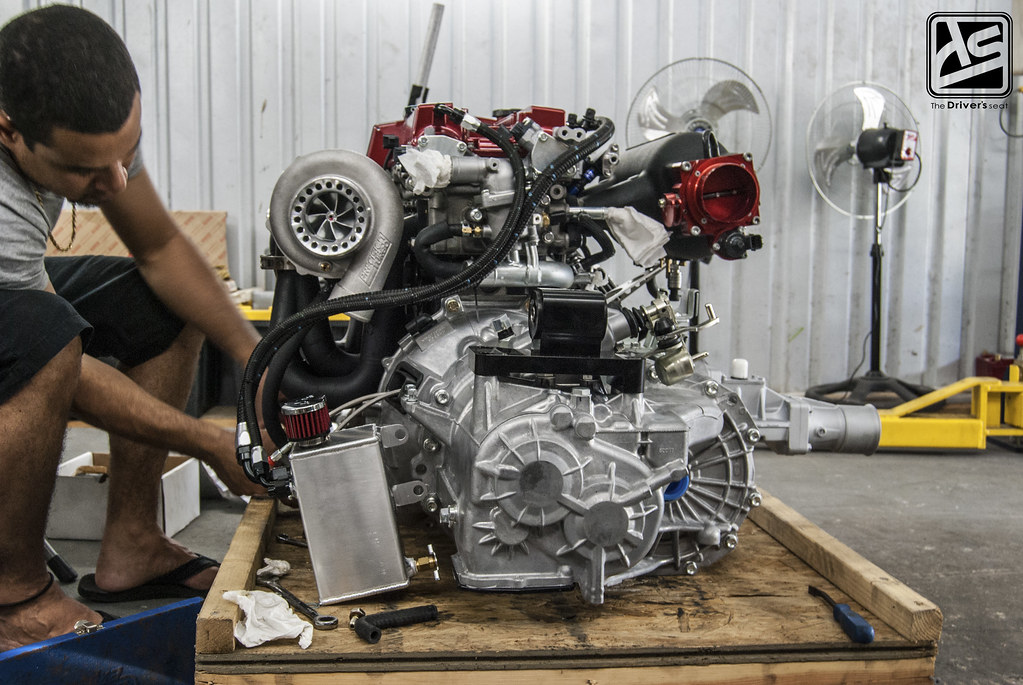
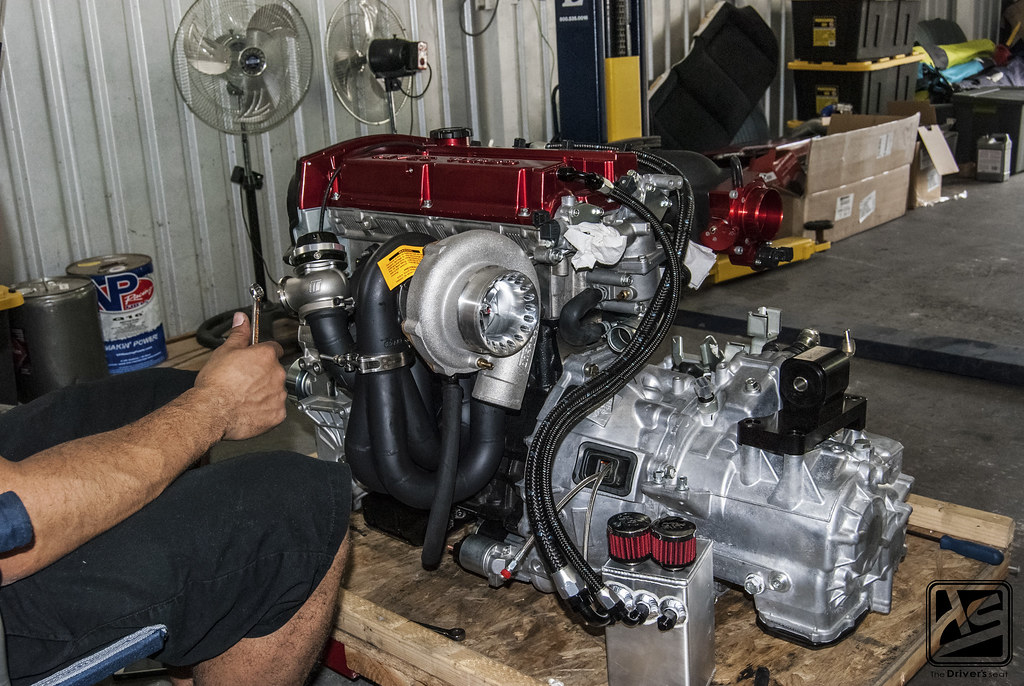
Some shots of the rear of the engine, where you can see how the Shep Trans transfer case is bolted in place and also how the huge AMS intake manifold is braced onto the block…

Some final shots of the setup before making its way into the bay…

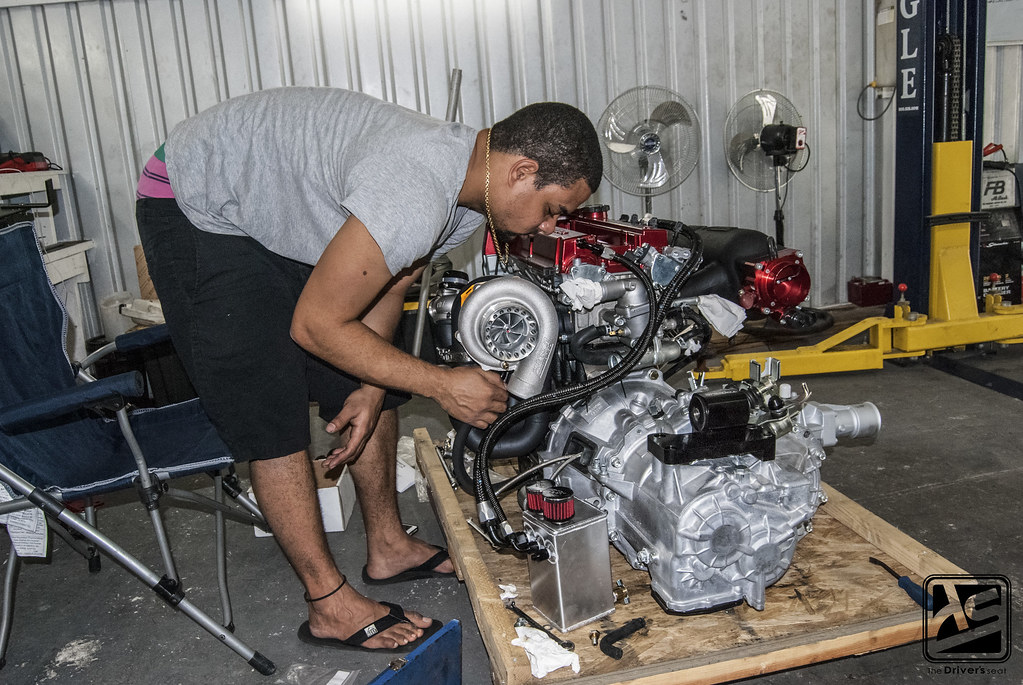
Scott as he prepares to drop in the motor assembly…
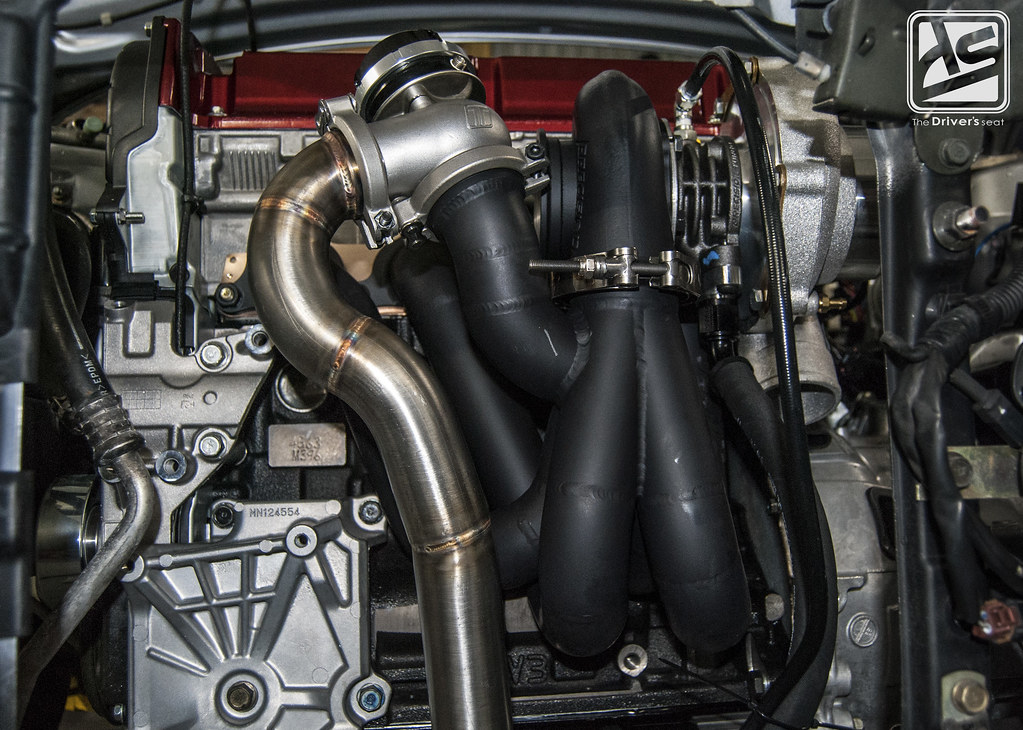
Stainless steel wastegate dump tube installed…
In just a matter of time Scott had the motor fitted, the joys of working with a hoist…
Side shot showing off the Precision 6466 turbo…
The motor install was a success with only a few more things to be taken care of…

An item Sol picked up to complete the interior was a Nardi perforated leather wheel with anodized black spokes…
With the motor and most of the drivetrain fitted, Scott was ready to call that a day and I took one more shot to close out the day…

The front end after Scott went ahead and mounted the intercooler and piping kit…
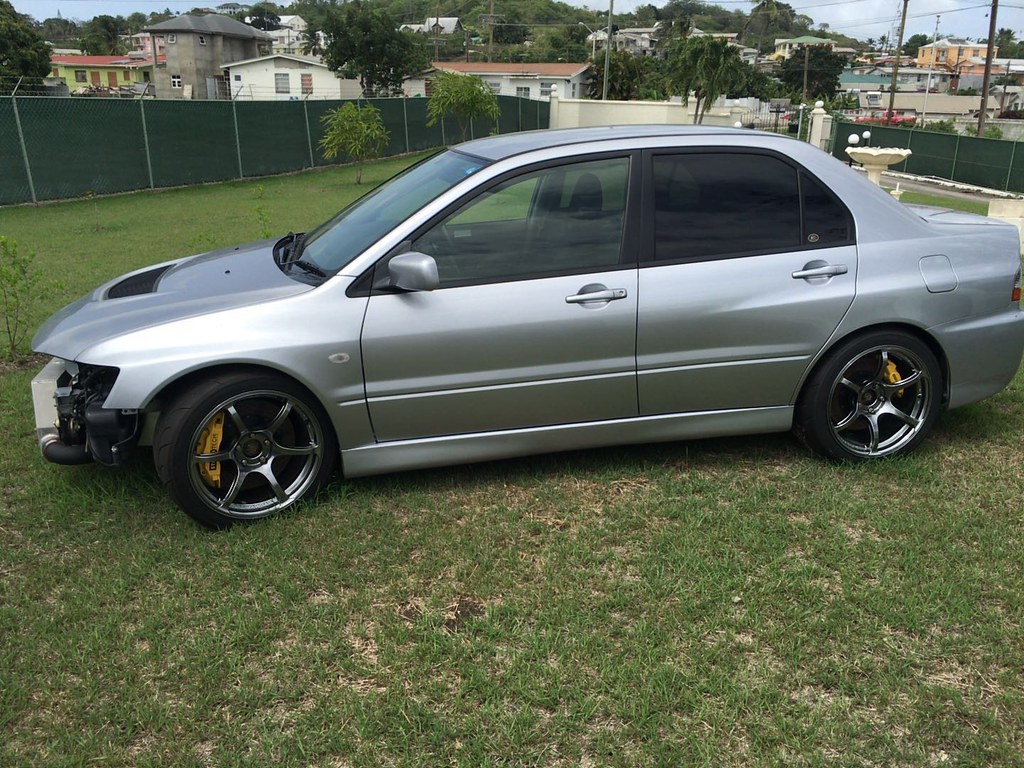
As for wheels, Sol picked up a set of Advan Racing RG II in 18×9 +25…
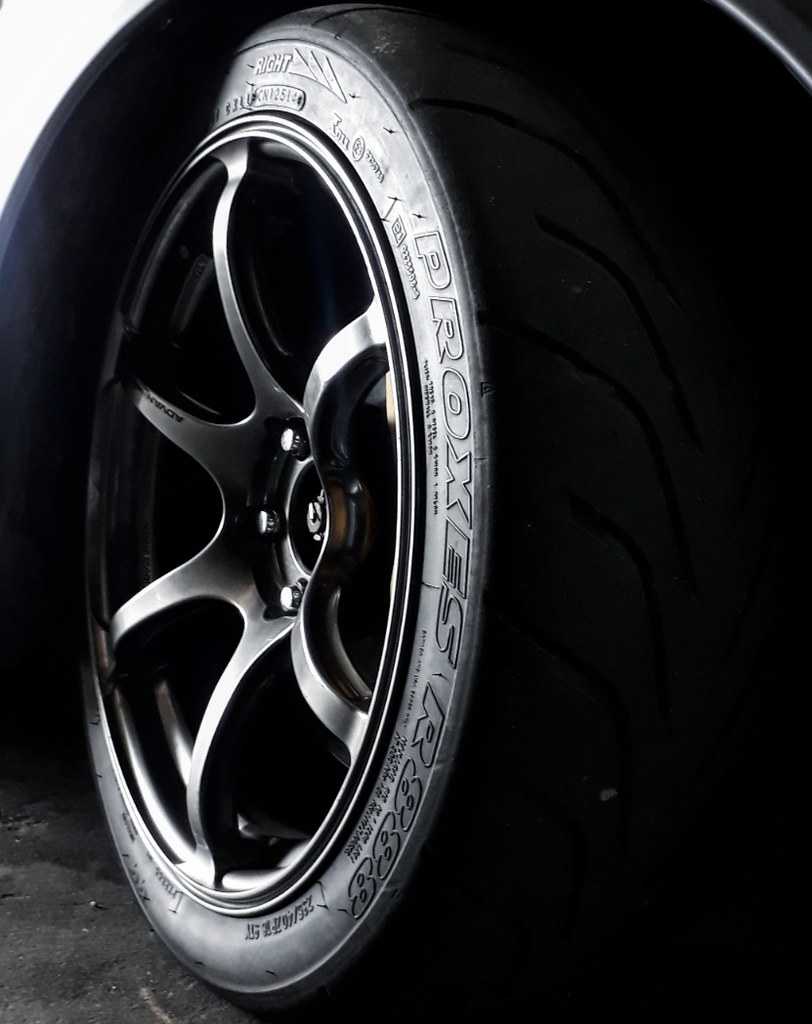
The rubber Sol selected to aid in harnessing the 2.3 Buschur built motor was a set of Toyo R888 tyres in a 235/40 profile at all four corners…
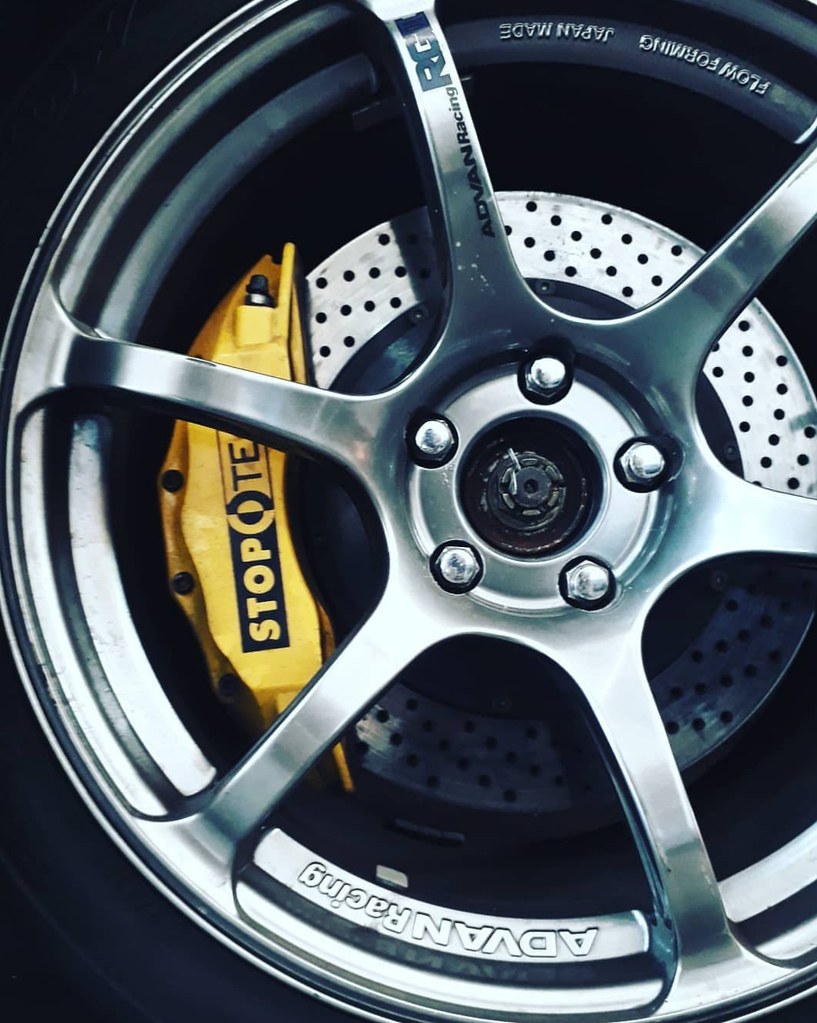
Not forgetting to mention the Stop Tech big brake kit that was fitted along with drilled 355mm rotors…
A shot of the rear where you guys can get an idea of the fitment on the new wheels…
As the Evo sat still missing the front end on the newly fitted Advan RG II wheels…

Can’t seem to get enough of these mint Recaro seats, Sol was fortunate enough to acquire a car with relatively low mileage and the interior to match being in immaculate condition…
Close up on the carbon fibre gauge pod which is mounted just behind the steering wheel…

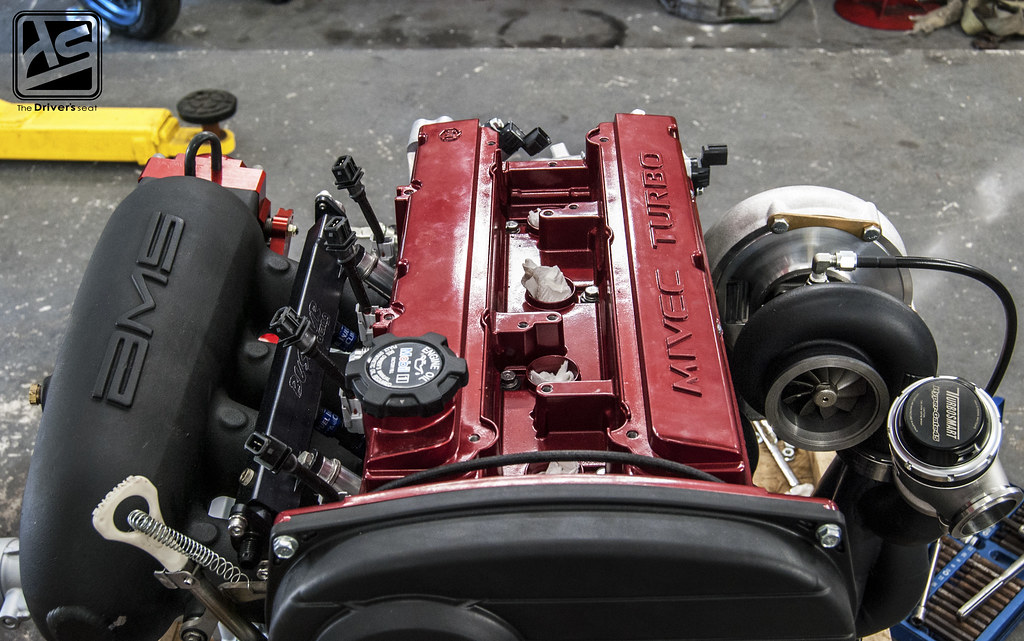
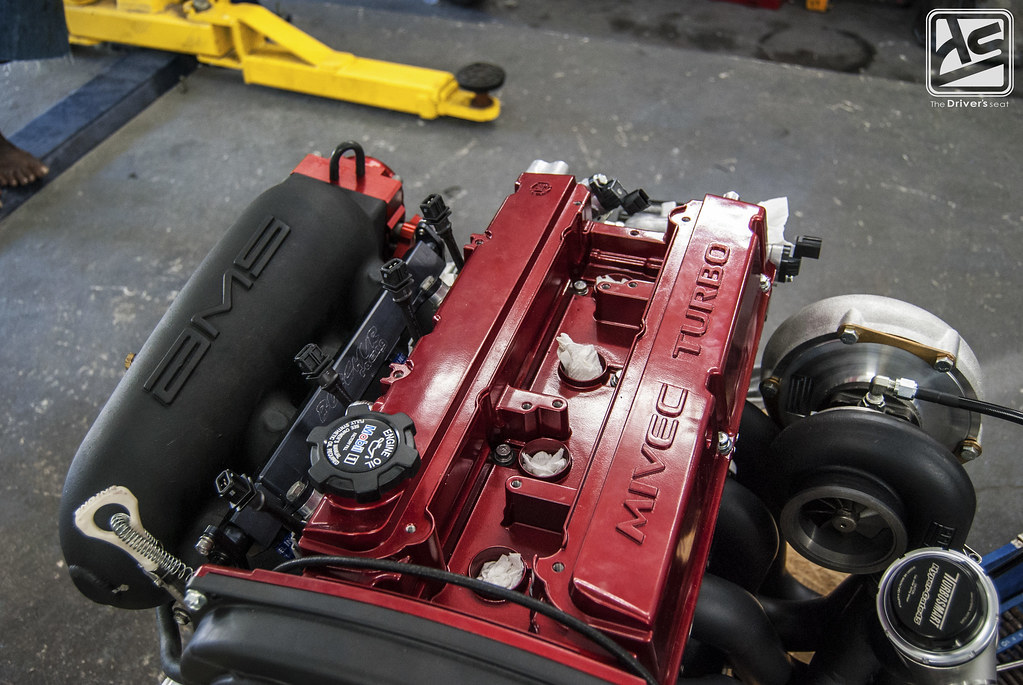
Over time the valve cover was resprayed in a bright red…

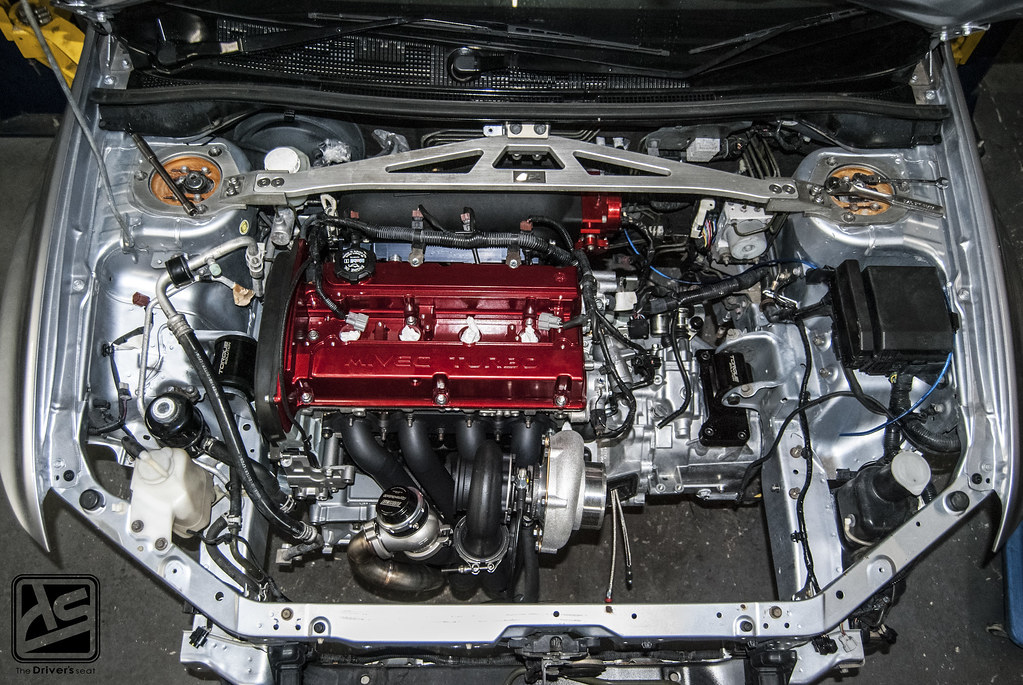
A few shots of the completed engine bay…

In the ignition department a Spark Tech unit was installed…

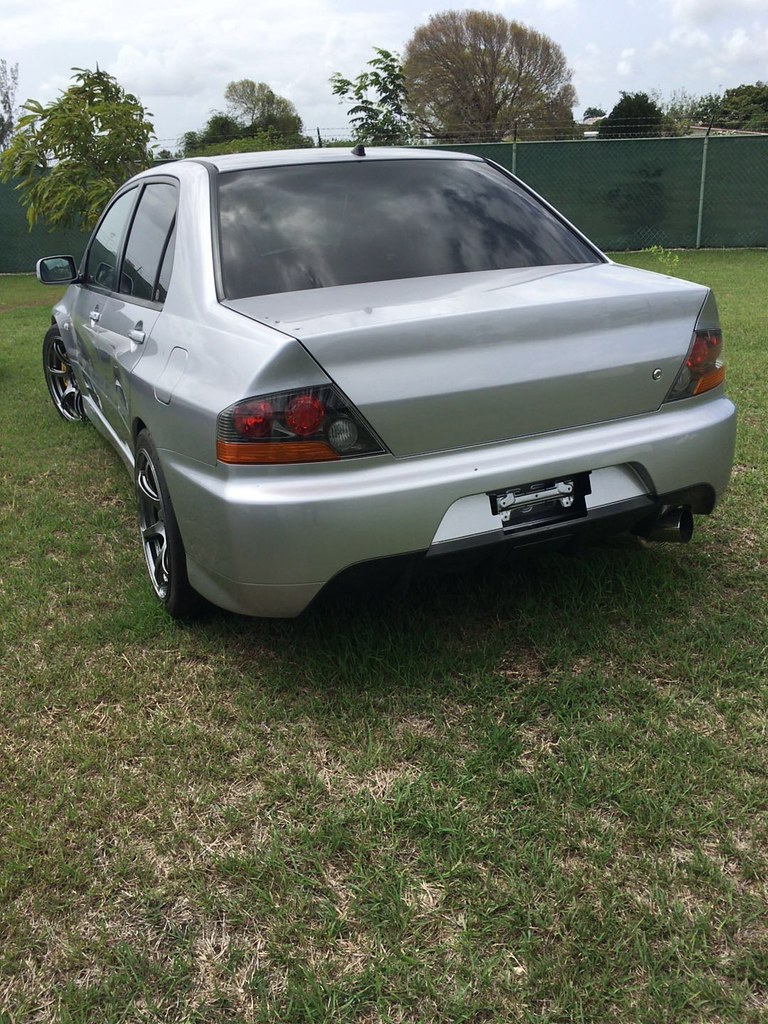
Being a huge fan of the Evo IX appearance from the factory, Sol kept the exterior as simple and basic as possible…
The car has been completed for some time and has been doing some street driving ever so often. The opportunity came up when B.A.D.D held an 1/8 mile event for Sol take the car out and give it shakedown. After completion of the car, it was never put to the test and this was the perfect time to see what results would be yielded.

The car’s best time in the 1/8 mile was 6.28secs @ 119mph…

After attending the drag event the car suffered some gearbox issues. The plan is to have these issue rectified and return as a the fun street car Sol initially intended on.
Below is a short clip of one of his passes on the 1/8 mile…
Fast forward a few months… The car sat for a while before the guys got around to repairs, during this time Sol’s attention was caught elsewhere. That was until B.A.D.D announced there will be a 1/4 mile acceleration test in January. Not having the drag built CT9A up and running at the time Sol decided for the fun of it, he’ll make a push to take the street car to the event. With the event a few weeks away the guys began the prep work to have the car tuned and ready to go…

Upon looking over the car, the guys thought it would be a good idea to shed a few pounds and swapped over the doors from the drag car…

For the streets the Advan RG II wheels were perfect, but as the guys were more about function than form they would be useless for the event…
A look at the Stop Tech big brake kit that is currently on the car; this too would have to go as the guys had in there possession…
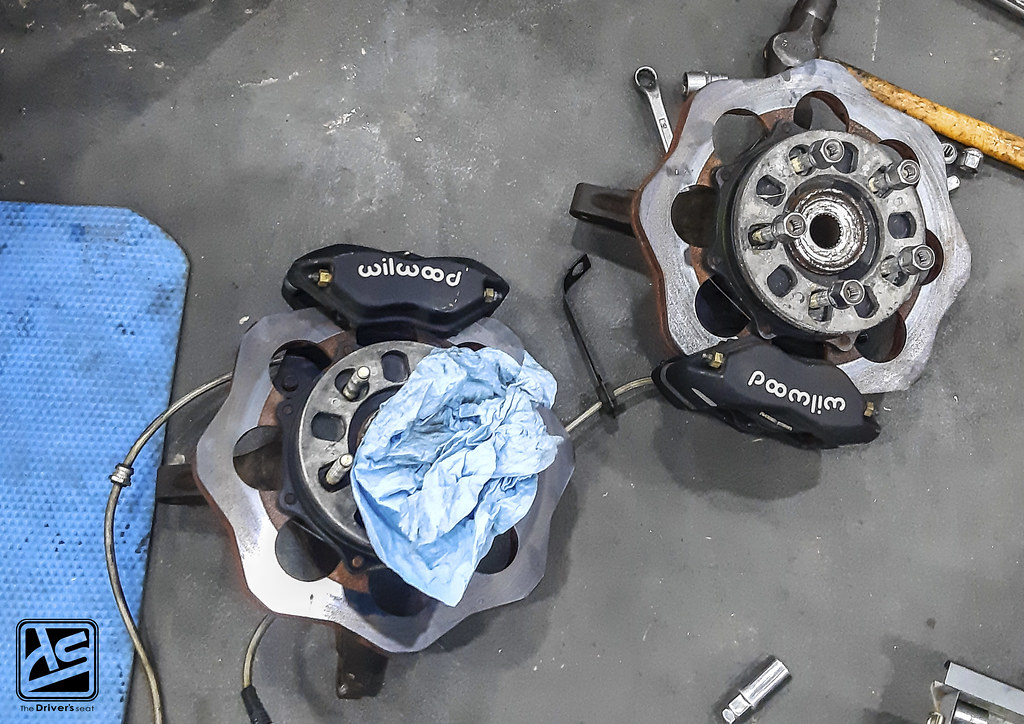
The Wilwood drag brake kit which allowed them run a 15″ wheel setup on the car with way more tyre. This will ultimately lead to an increase in traction…

The guys went to work on removing the big brake kit, which unfortunately both the front and rear needed to be swapped out…


The rear was swapped out for the factory Brembo setup which allowed for the wheels to fit…

Sol went with a full set of M & H Racemaster drag slicks on all 4 corners of the Evo IX…

A look at the untouched front end, which was the only area which didn’t receive any modifications for the event…

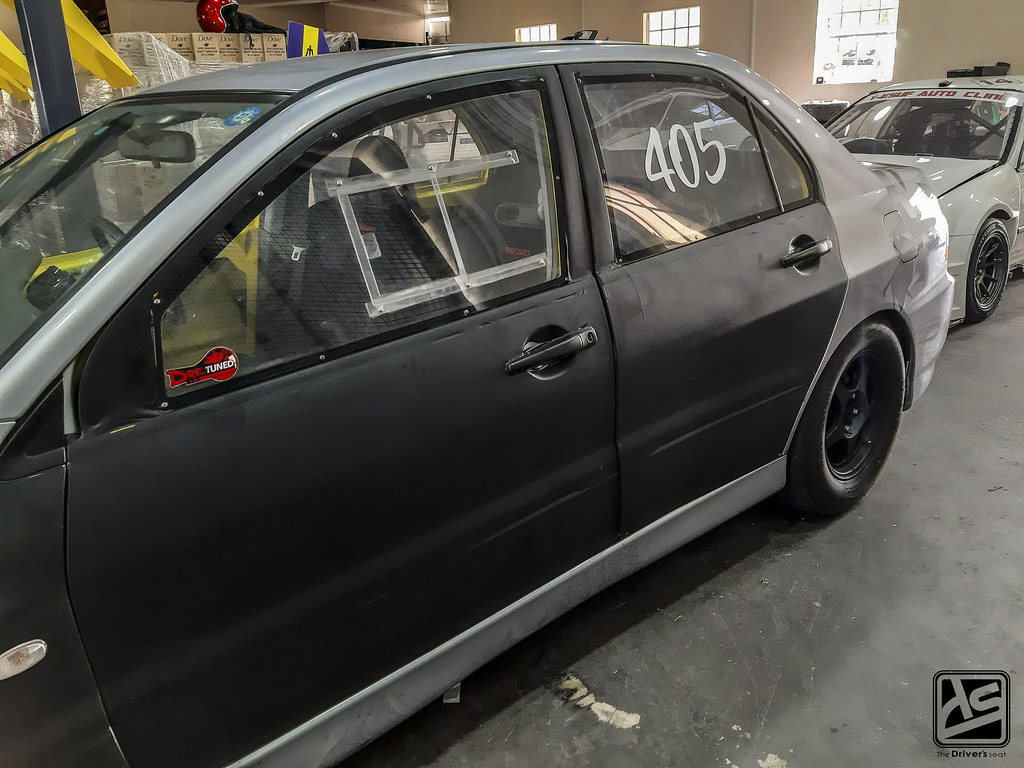
As you guys would have noticed in a previous photo, the doors were in the process of being wrapped for the event, as to blend a bit better with the silver hue on the exterior…

A view of how loud the bright yellow paint was on the interior…

Another angle of the interior from through the sliding window in the composite door, where you can see the deep corn Nardi wheel and carbon dual gauge pod…

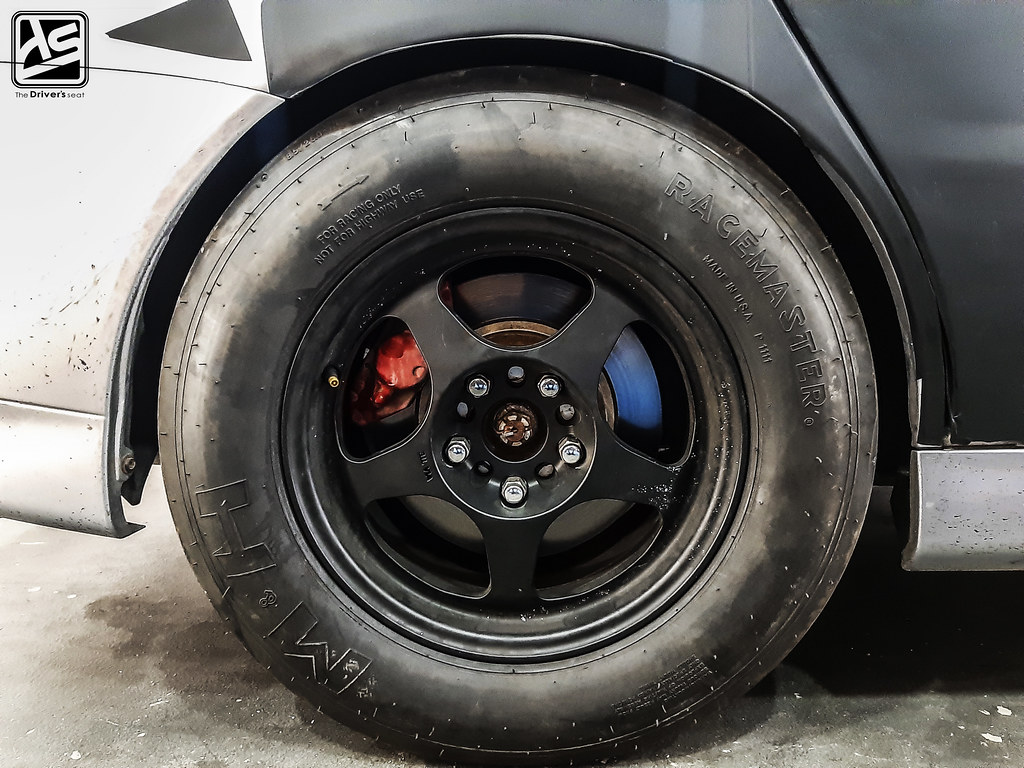
A close up of the rear wheel and tyre setup up with the factory Brembo calipers that were necessary to bring this package together…

At the rear of the car the wing was removed to keep the weight down…


The rear quarter showing the design that was applied to help tie in the black wrap on the doors…


Moving to the other side where the abstract designed varied…
Below is a video of the car as it made one of its two passes…

That brings us to a close on this update of Sol’s CT9A street car build. The car returned home safely without any damage with a big thanks to the entire team who came together made this all possible. Those long hours and late nights spent were the key in making this a successful event. Sol piloted the car to a 9.97secs pass @ 141mph, putting him at 2nd fastest vehicle on the day. The goal for next event would ideally be to have the drag car up and running, however knowing Sol it is a high possibility that the street car may return to the track for another B.A.D.D event.
For those interested, I’ve included a link to some of the coverage from B.A.D.D We gathering Acceleration Test below…
